


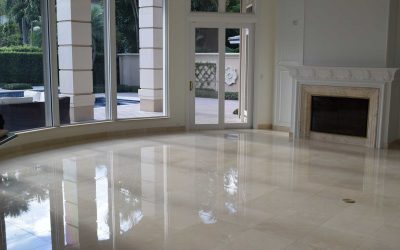
Marble, with its timeless beauty and elegance, has been a symbol of luxury and sophistication for centuries. This natural stone is often used in high-end homes, historic buildings, and monuments due to its unique aesthetic appeal and durability. However, maintaining its pristine condition requires a commitment to regular care and attention. At Pacific Marble Restoration, we understand the intricacies involved in marble care, and today, we’re sharing our expert step-by-step guide to marble polishing. Whether you’re dealing with marble countertops, floors, or decorative pieces, this guide will help you restore and enhance your marble’s natural shine. Regular polishing not only maintains the marble’s visual appeal but also protects it from wear and tear, ensuring that it remains a stunning centerpiece in your home or office.
Understanding Marble and Its Needs
Marble is a metamorphic rock formed from limestone under extreme heat and pressure. Its unique veining and color variations make it a sought-after material in homes and buildings. Each marble slab is distinct, with variations in hue and pattern that add to its charm and elegance. However, marble is porous and susceptible to staining and etching, requiring specific care techniques to maintain its luster. Understanding the nature of marble is the first step in effective restoration and polishing. The stone’s porosity means that it can easily absorb liquids, leading to potential discoloration if not properly sealed and maintained. Being aware of these characteristics helps in selecting the right products and methods to preserve its beauty.
Step 1: Preparing for Polishing
Before you begin polishing your marble, it’s essential to prepare the surface properly. This preparation will set the foundation for a successful restoration. Proper preparation ensures that the polishing process can proceed smoothly and effectively, leading to a flawless finish. It also helps in identifying any areas that may need special attention or repair before the polishing begins.
Cleaning the Surface
Begin by cleaning the marble surface thoroughly to remove any dirt, dust, or debris. Use a pH-neutral cleaner specifically designed for marble. This type of cleaner is gentle on the stone and will not cause any damage during the cleaning process. Avoid acidic cleaners, as they can damage the stone. Acids can etch the surface, leading to dull spots that are difficult to remove. A soft cloth or sponge is ideal for gently wiping the surface clean. This gentle cleaning method helps in maintaining the integrity of the marble while preparing it for polishing.
Inspecting the Marble
Inspect the marble for any cracks, chips, or deep stains. These imperfections need to be addressed before polishing to ensure a smooth and even finish. Small cracks can often be repaired with a suitable filler, while deep stains might require special cleaning agents or professional attention. Consider consulting a professional for repairs if necessary. A professional can provide expert advice and solutions for any significant damage, ensuring that the marble is in optimal condition before polishing.
Step 2: Choosing the Right Polishing Method
There are several methods to polish marble, each with its own benefits. The choice depends on the condition of your marble and your personal preference. Understanding the advantages and limitations of each method will help you make an informed decision that suits your specific needs. It’s important to consider factors such as the size of the area to be polished and the level of expertise required for each method.
Polishing Marble by Hand
Hand polishing is ideal for smaller surfaces or intricate designs where machines might not reach. This method allows for careful attention to detail, ensuring that even the most delicate patterns are preserved and enhanced. Use a marble polishing powder and a soft buffing pad. Apply the powder to the surface and gently buff in a circular motion. This method allows for precise control and is perfect for touch-ups or smaller areas. Hand polishing is also a great option for those who prefer a more hands-on approach to marble care, allowing for a personal touch in the restoration process.
Using a Polishing Machine
For larger surfaces like floors or countertops, a polishing machine can save time and effort. Machines are efficient for covering expansive areas, providing consistent results across the entire surface. Use a machine with variable speed settings and a suitable polishing pad. Start with a lower speed to evenly distribute the polishing compound and gradually increase the speed for a high-gloss finish. The use of a machine requires some level of expertise, so it’s important to familiarize yourself with the equipment and follow safety guidelines to achieve the best results.
Step 3: Polishing the Marble
With your method chosen, it’s time to bring out the marble’s natural shine. This step is where the transformation occurs, as the marble regains its lustrous appearance and vibrant color. Proper technique and patience are key to achieving a professional-level finish.
Applying Polishing Compound
If using a polishing powder, mix it with a little water to form a paste. This paste acts as a mild abrasive, gently smoothing the surface while enhancing its shine. Apply the paste to the marble and use your hand or machine to work it into the surface. For liquids or creams, apply directly onto the marble and spread evenly. The key is to ensure that the entire surface is covered with the compound, allowing for even polishing across all areas.
Buffing the Surface
Buff the marble in a circular motion, ensuring even coverage. This process will remove minor scratches and restore the marble’s shine. Circular motions help distribute the compound evenly and prevent streaking or uneven polishing. Be patient and take your time, as rushing may lead to uneven results. Achieving a flawless finish requires attention to detail and a steady hand, ensuring that every part of the marble is polished to perfection.
Rinsing and Drying
Once you’ve achieved the desired shine, thoroughly rinse the marble with clean water to remove any residue from the polishing compound. Residues can dull the finish if not properly removed, so this step is crucial for maintaining the marble’s brilliance. Dry the surface with a soft, absorbent cloth to prevent water spots. Water spots can mar the polished surface, so ensure that all moisture is removed promptly for a flawless finish.
Step 4: Maintaining the Shine
Polishing is just one part of marble care. Regular maintenance will keep your marble looking its best. Ongoing care is essential to protect your investment and preserve the beauty of the marble over time. Establishing a consistent maintenance routine will help in extending the lifespan of the polished finish.
Sealing the Marble
Consider applying a marble sealer to protect the surface from stains and etching. Sealers fill the pores in the marble, providing a protective barrier. This barrier helps to repel liquids and reduce the risk of staining, preserving the marble’s appearance. Follow the manufacturer’s instructions for application and reapply as needed. Regular sealing is an important preventative measure in maintaining the marble’s condition.
Regular Cleaning Routine
Implement a regular cleaning routine using a pH-neutral cleaner and a soft cloth. Consistent cleaning helps in removing surface dirt and preventing buildup that can dull the finish. Avoid harsh chemicals and abrasive materials that can damage the marble. Promptly clean up spills to prevent staining. Quick action is important in preventing liquids from penetrating the stone and causing damage.
Avoiding Common Pitfalls
Avoid placing hot items directly on marble surfaces, as they can cause thermal shock and damage the stone. Sudden temperature changes can lead to cracks or discoloration, so it’s important to protect the surface from heat. Use coasters, trivets, or placemats to protect the surface. These simple precautions can significantly extend the life of your marble surfaces and maintain their beauty.
Trust in Pacific Marble Restoration
At Pacific Marble Restoration, we pride ourselves on our commitment to excellence and customer satisfaction. Our team of experts is dedicated to providing the highest quality marble restoration services. We have extensive experience in handling all types of marble surfaces, ensuring that your investment is well cared for. We understand the value of your investment and are here to help you maintain its beauty for years to come. Our tailored solutions are designed to meet your specific needs, providing personalized care and attention to your marble surfaces.
Conclusion
Polishing marble is an art that requires patience and precision. By following these steps, you can restore your marble’s natural shine and elegance. Whether you’re a homeowner or a business, maintaining your marble surfaces not only enhances their appearance but also prolongs their lifespan. Trust in the expertise of Pacific Marble Restoration to guide you in preserving the timeless beauty of your marble. Our comprehensive approach ensures that your marble remains a testament to luxury and sophistication.
For more information or to schedule a professional restoration service, contact Pacific Marble Restoration today. Let us help you bring out the best in your marble surfaces. Our knowledgeable staff is ready to assist you with any questions or concerns, providing expert advice and solutions tailored to your needs.


0 Comments